What is a croquis?
Croquis refers to a quick sketch of a fashion model. In French “Qroquis” means sketch. So qroquis means sketch of figure. It can be of different shapes and styles.
Importance of qroquis drawing in fashion
Croquis drawing gives blank canvas for designing clothing. Qroquis drawing does not include detailed drawing of face, hands or feet. It rather focuses on garments. Yes, we draw qroquis to draw basic design of a dress.
Some things to remember
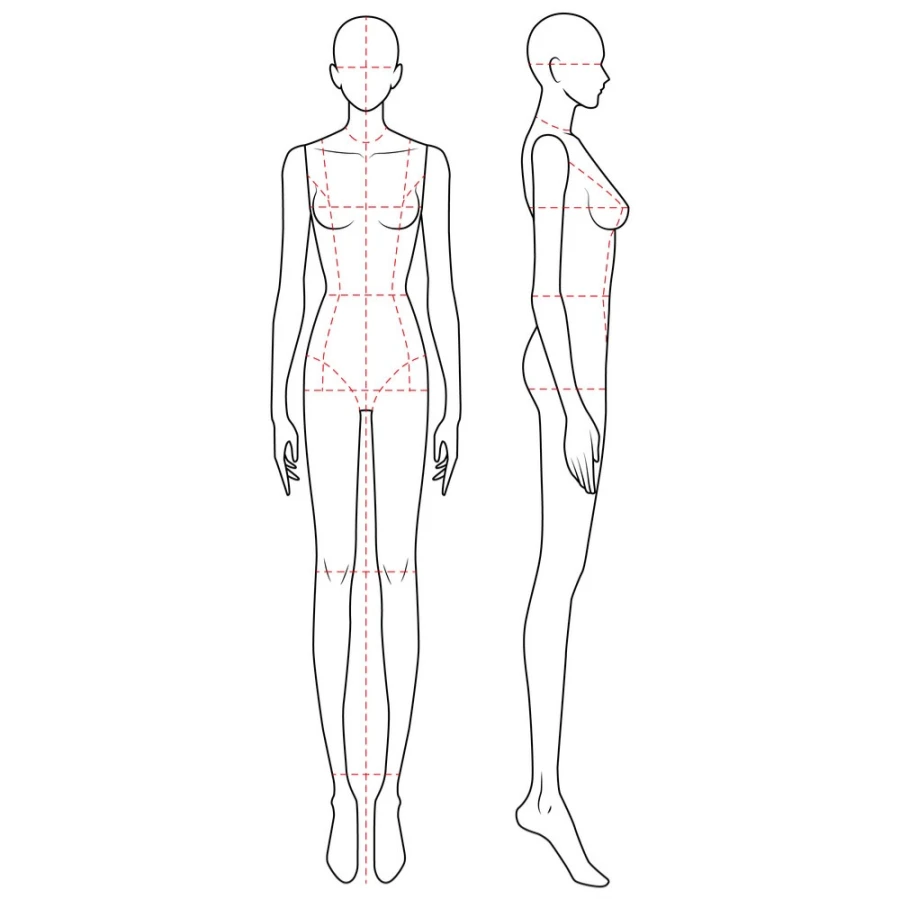
Remember qroquis drawings are for dress designing. Its purpose is to show the detailed outline of a garment before making. Clients get idea how his or her dress is going to look. So, the body proportions for this kind of drawing are disproportionate to the actual human body. Legs are elongated to exaggerated height.
You can draw croquis in different poses to convey the better showcase of a garment. For example, legs standing wider part can be drawn to better show the slits in skirts or girth of skirt.
Types of croquis drawings
According to our needs, we can draw croquis in different sizes. Such as, 8-head, 9-head, 10-head, 12-head croquis. In this tutorial we’ll learn how to draw a 9-head croquis.
What does “head” means in croquis drawing?
The height and breadth of the head, i.e., the size of head plays as a guide for the measurements of the rest of the body. So, 9 head means the body is divided into 9 equal parts from top to bottom. Remember, the feet are excluded in this case.

What is the ideal size of a head?
There is no particular size of head for croquis drawings. From a little piece of paper to a big size one, you can change the size of figure by drawing 9 heads according to you wish. But, if you are drawing on a A4 or A3 size paper, you can have each head sized to be 1” tall but the breadth is your choice.
Necessary tools to draw a croquis
First you need a piece of paper, a pencil, an eraser, and a ruler. Remember, always draw lightly so you can erase very easily.
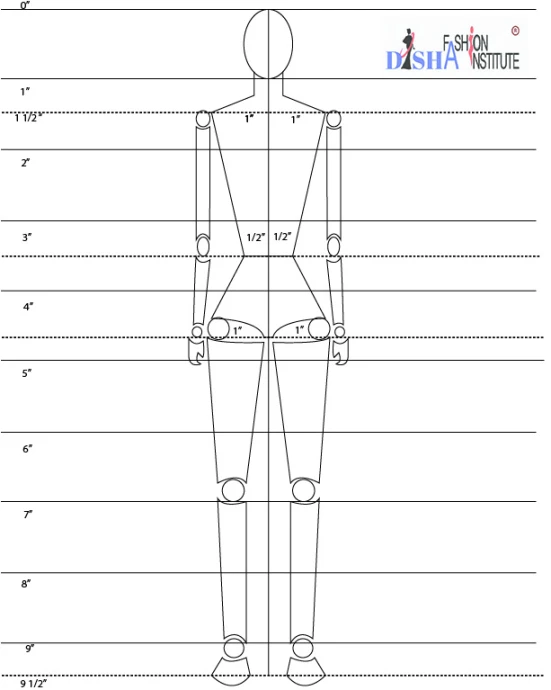
Let’s start drawing 9 head croquis
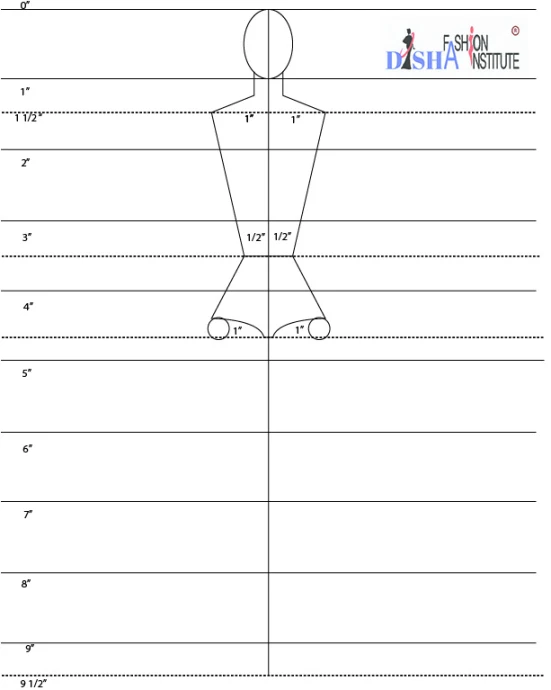
- Step 1: Draw 1 straight line that is 9 inch long.
- Step 2: Mark at 1 inch distance from top to bottom
- Step 3: Draw horizontal lines on the marks

Step 4: Draw an oval for the head about 1” length
Step 5: Add a dashed line at roughly 1 ½”

- Step 6: Draw 2 parallel vertical lines just below the head (for neck) and draw a horizontal line for the shoulders of 2” wide (1” wide in both sides of the 1st vertical line). Remember the neck and shoulder line should end at 1 ½” dashed line.
- Step 7: Add another dashed line at 3 ½” (1/2” wide in both sides from the 1st vertical line). This is waist line.
- Step 8: Now join the shoulder and waist line in both sides.

- Step 9: Again add a dashed line at 4 ¾” length (width- 1” in both sides from the 1st vertical line). This is hip line.
- Step 10: Join the waist line and the hip line in both sides.
- Step 11: Draw two small ovals for hip joint at this height.
- Step 12: Give shape at hip for drawing upper legs.
- Step 13: Draw two small ovals for knees at 7” height
- Step 14: Draw the upper legs as shown in the photo
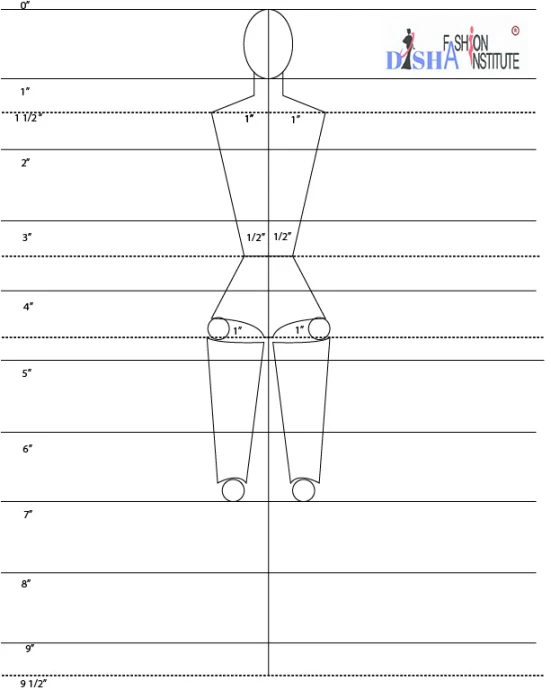
- Step 15: Again draw two small ovals for feet joint at roughly 9” height.
- Step 16: Draw the lower leg as shown in the photo

- Step 17: Now draw the feet of length as per your choice. (In this tutorial roughly ½” height is taken to draw the feet.
- Step 18: Then draw small ovals on shoulder joint and other small ovals at roughly 3 ½” height where the waistline was drawn(for elbow)
- Step 19: Draw the upper arms.
- Step 20: Draw small ovals at 4 ¾” height for wrist joint and draw the lower arms.
- Step 21: Now draw the fingers.
P.S. This is a basic figure outline. You can edit the croquis as your choice, manipulating proportions as necessary.